TryHackMe - Reversing ELF
Reversing Elf is a TryHackMe challenge that lets you look for flags in 8 Crackme files.
Tools Used
Radare2
Radare2 is an open source command-line reverse engineering tool. It lets you disassemble and debug programs.
Ghidra
Ghidra is a reverse engineering tool that was developed by the NSA. The tool allows you to disassemble and decompile binaries, as well as other RE operations.
Crackme1
Task 1: Let’s start with a basic warmup, can you run the binary?
When we run the file command it tells us that this is a 64 bit elf file.

The challenge says “Let’s start with a basic warm up, can you run the binary?”.
This pretty much tells us that we just need to run the file to get a flag.
By giving the crackme1 file execution rights we can run it and get the flag.

Crackme2
Task 2: Find the super-secret password! and use it to obtain the flag
This challenge has two parts. The first part is to find the password and the second part is to use the password we found to get a flag.
Running the file command tells us that this is a 32 bit elf file.

By using the strings command we can check to see if there are any hard coded passwords.
When we check we find the string super_secret_password
We can also see the program’s usage message which tells us to run it with what we think is the password.
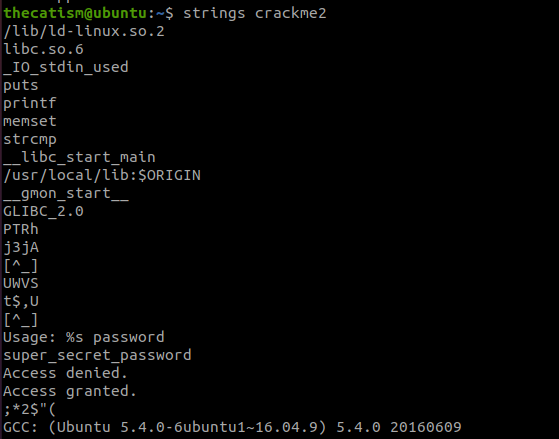
When running the program with the string super_secret_password we receive the access granted message and our flag.

Crackme3
Task 3: Use basic reverse engineering skills to obtain the flag
This challenge tells us to use basic reverse engineering skills to obtain the flag.
The file command tells us that this is a 32 bit elf file.

The strings command shows us that there is a base64 encoded string.
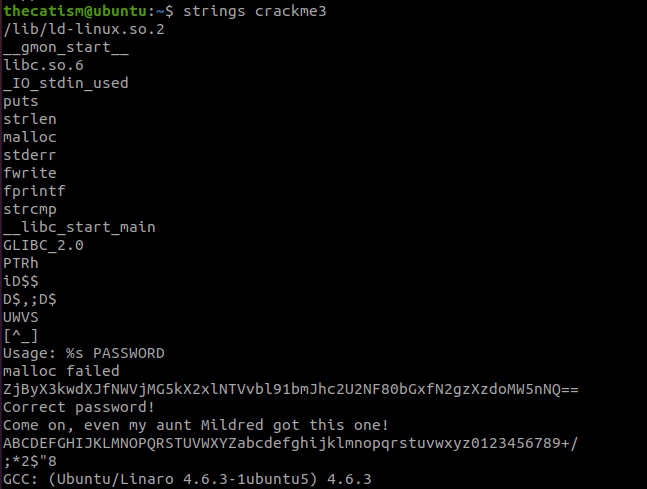
Decoding the string gives us our flag.

Running the program and using the flag as the password will also display the correct password message.

Crackme4
Task 4: Analyze and find the password for the binary?
This challenge tells us to analyze it and find the password.
Running the file command tells us that this a 64 bit elf file.

strings tells us that the program hid the string and used the string compare function.
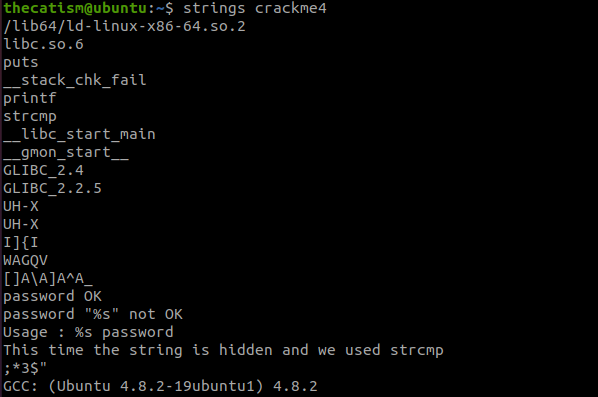
Since we can’t see any hard coded passwords we will use a debugger and analyze the binary.
The debugger I will use is radare2.
To debug a file with radare2 you need to run this command: r2 -d ./crackme4 <password_arguement>.

To analyze the file type aa. This tells the debugger to analyze all the flags. After the analysis is complete you can type afl. This will list all of the functions used by this program. If there’s a lot you can pipe the output to grep and search for the main afl | grep main.
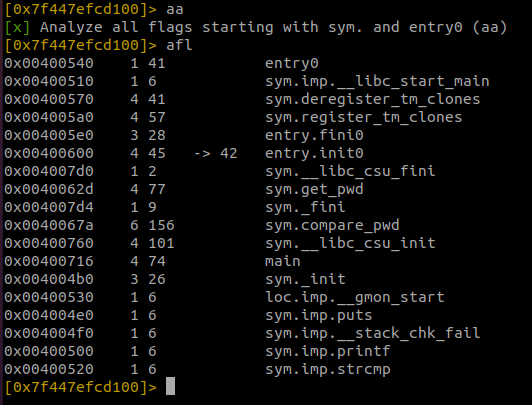
To disassemble a function like the main function, for example, run pdf @main
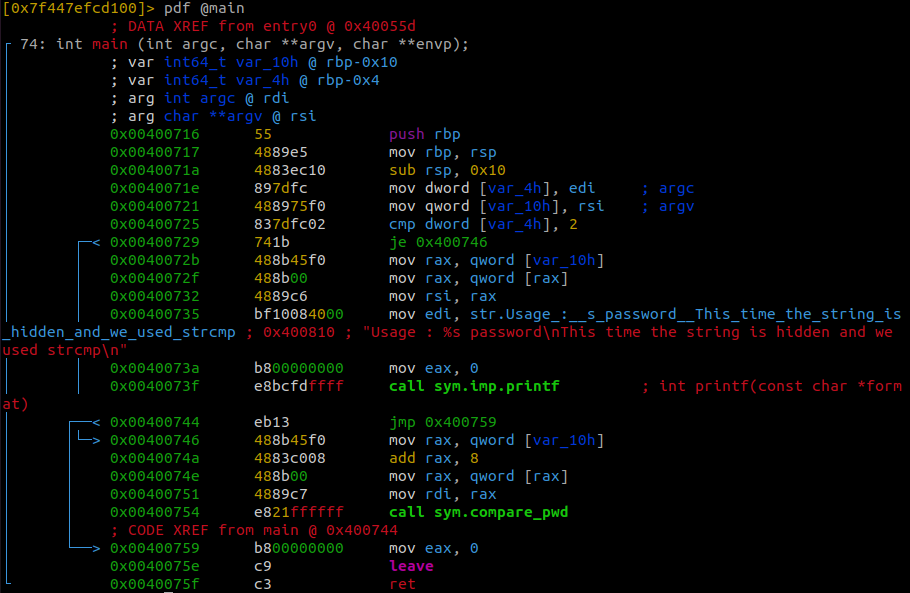
Looking at the main we can see that the program first checks that the correct amount of arguments was passed into the program.

The program does a comparison to check that the right amount of arguments was provided. If the right amount was given the program jumps to the memory address located at 0x400746. Otherwise, the program prints the usage menu. We can also see that our input is stored in the variable var_10h
Since we know that we passed a password when we started radare2 we can follow the jump.
The jump takes us to a section of the main where the program calls a compare_pwd function.

Since we know that the program is comparing our input to the correct password, we can dissassemble the compare_pwd function and look for where the program does this comparison.
If we set our breakpoints correctly we should be able to print out the password before the program finishes and tells us that our input is wrong.
To dissassemble the compare_pwd function, we need to type pdf @sym.compare_pwd. This will give us the output shown below.
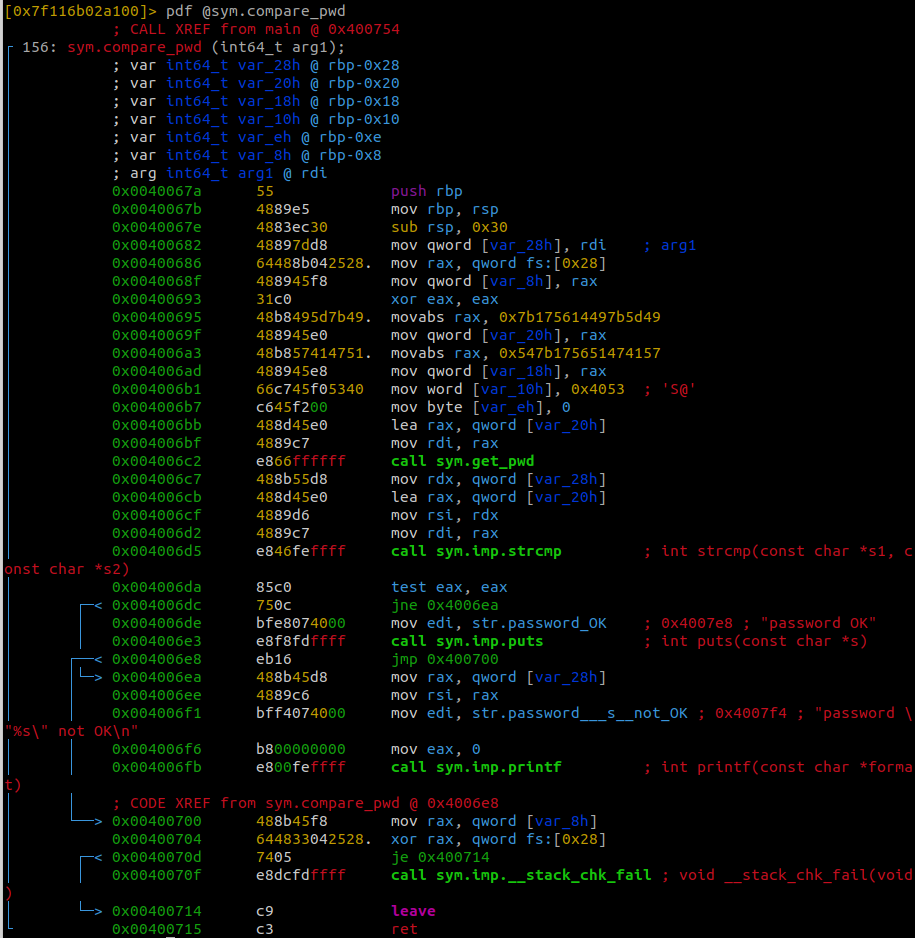
The function takes in one paramenter, which is the input that we provided. It then calls a get_pwd function and passes the variable var_20h as a parameter.
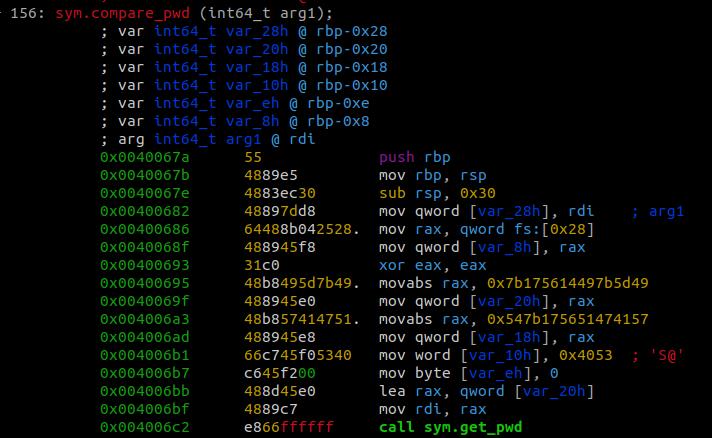
Based on the name of the function we can assume that this function is used to get the correct password.
After the program gets the correct password it then compares our input to the output of get_pwd. If the password is correct it will print out a password OK message otherwise it will print a password not OK message.
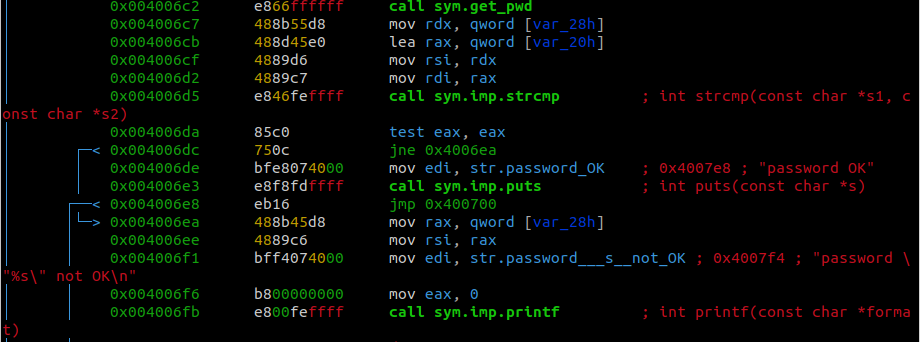
If we set a breakpoint after the get_pwd is called but before the strcmp function is called we should be able to print out what was returned by the get_pwd function.

By setting a breakpoint at the address of 0x004006cf we are able to print the contents of the variable var_20h, the variable that was passed into get_pwd.
To set a breakpoint type db <memory_address> and then type dc to run the program until you hit that breakpoint.
To print the contents of var_20h type px @ rbp-0x20. The rbp-0x20 is the location that the var_20h variable is stored at.
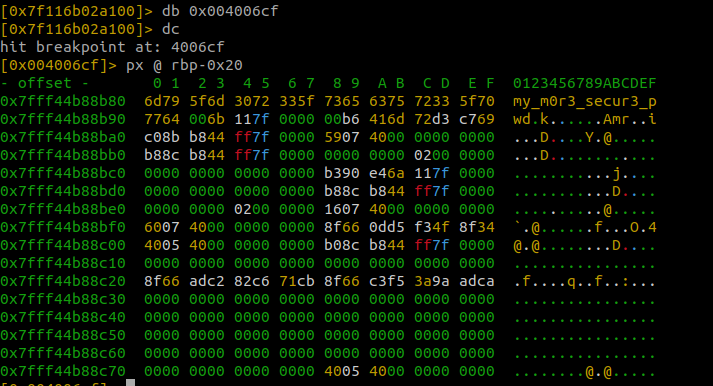
Looking at the hex dump we can see that the password is my_m0r3_secur3_pwd
Running the program with this password gives us the Password OK message.

Crackme5
Task 5: What will be the input of the file to get output Good game?
The challenge tells to find the input needed to get the output Good game.
Running the file command tells us that this a 64 bit elf file.

The strings command shows us that the program prompts for input and then depending on the input will either display the message Good game or Always dig deeper
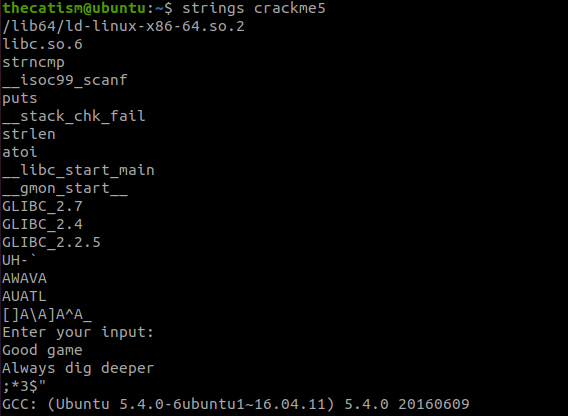
Similarly to how we did Crackme4, let’s start up radare2 and analyze the file.
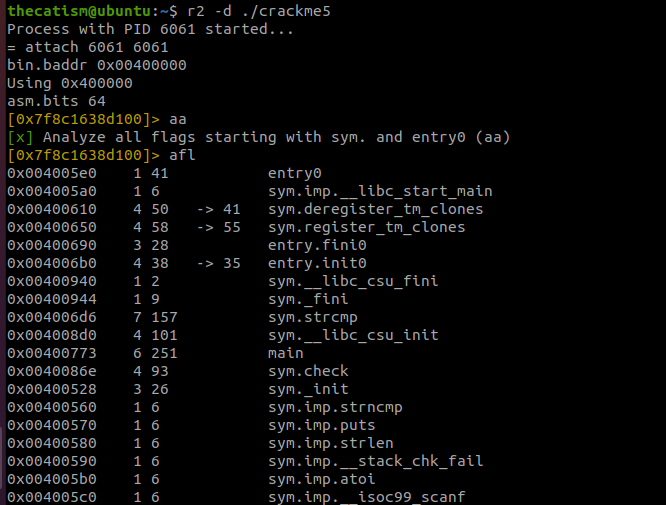
First thing we can notice when dissembling the main function is that there are a lot variables.
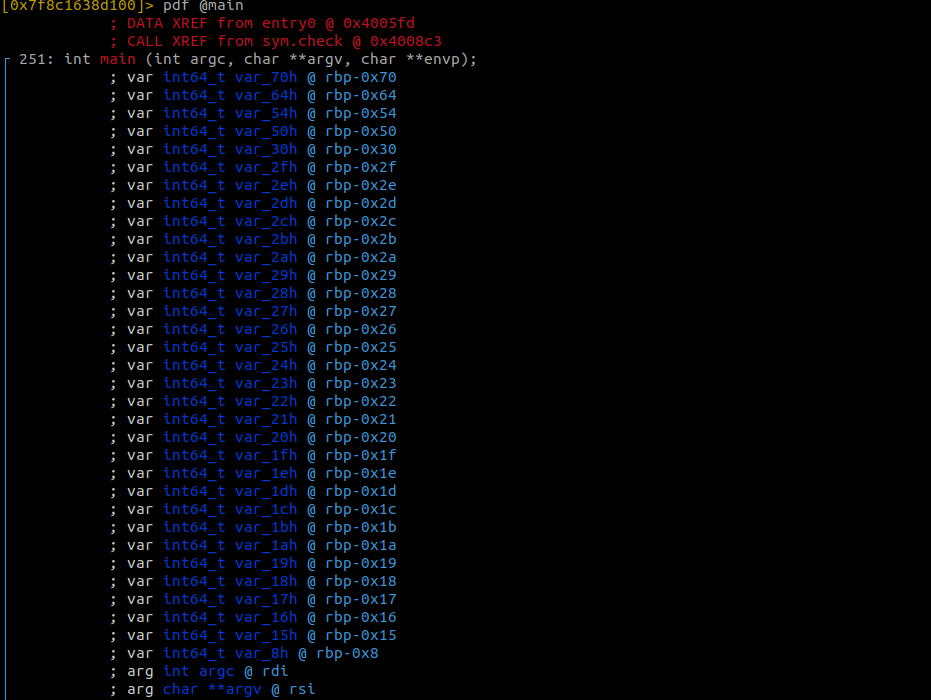
Scolling down some more we can see that before we are prompted for input, a lot of these variables are being set to a character. This is probably the string that we need to input in order to get the Good game message but let’s analyze some more and confirm our hunch.
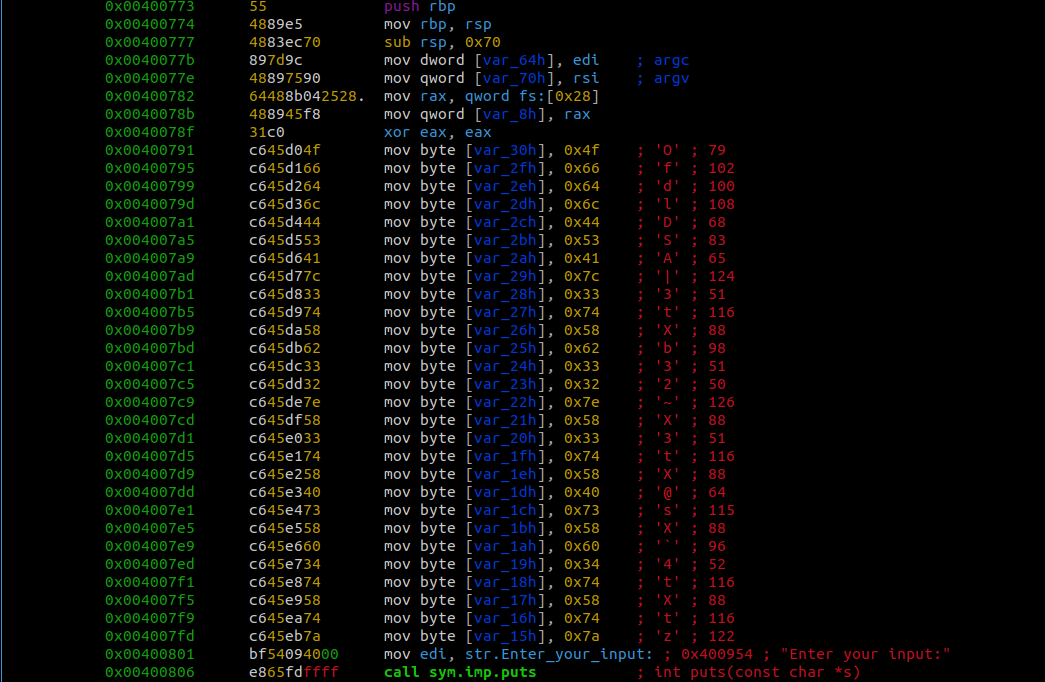
The rest of the main function shows that our input is taken in at memory address 0x0040081c. We can also see that the program calls the strcmp function at 0x0040082f.
The program later does another comparison. If this comparison is equal the program prints the Good game message, otherwise the Always dig deeper message will be displayed.
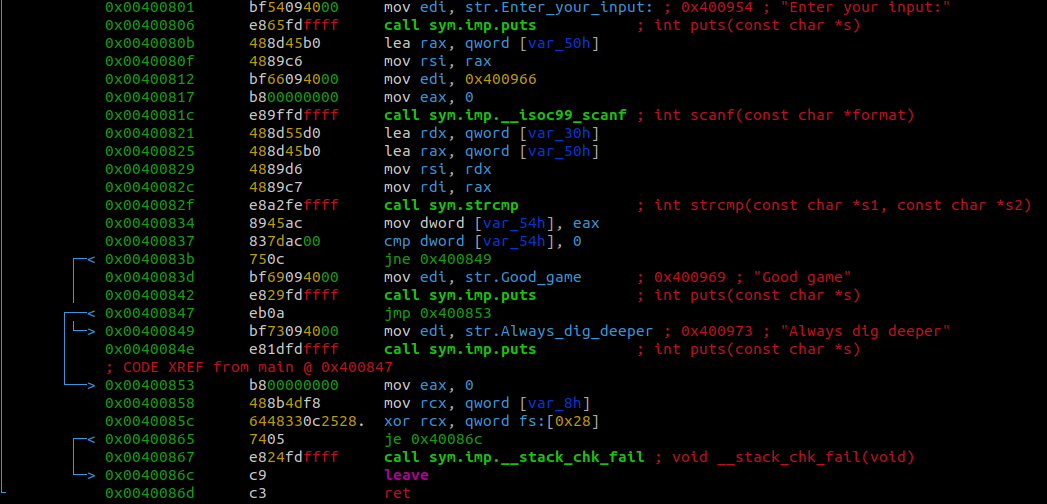
Similarly to how we found the password in crackme4, if we set a breakpoint somewhere between where the program takes in our input and where the string comparison is made, we should be able to print the string that our input is being compared to.
By setting a breakpoint at 0x00400829, we are able to print both our input string and the comparison string which were stored at var_50h and var_30h
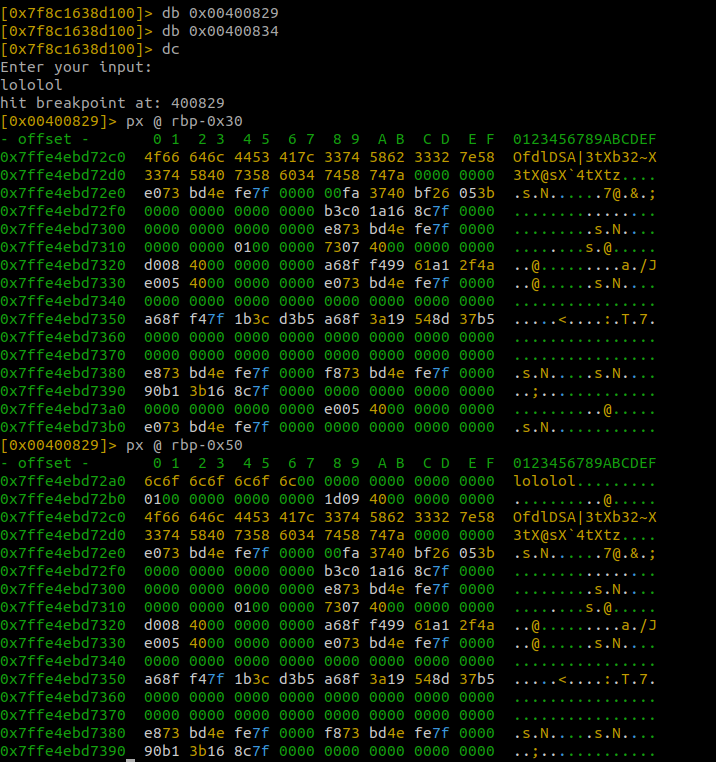
Looking at the output we see that our earlier hunch about the variables that were listed above was correct.
By using the string that was stored at var_30h we are able to get the Good game message.

Crackme6
Task 6: Analyze the binary for the easy password
Challenge tells us to analyze the binary and to look for the easy password.
The file command tells us that this is a 64 bit elf file.

The strings command shows us that the program looks for a password and that if the password is correct it will print password OK, on the other hand if the password is wrong it will print password not OK.
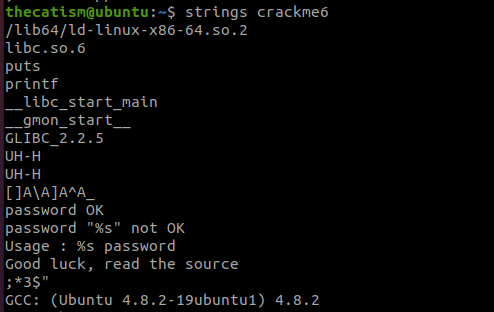
The usage menu tells us to read the source. This could be a hint telling us to use a decompiler.

Following the hint we can use ghidra as a decompiler.
If you haven’t used ghidra before you can start getting familiar with it by visiting https://ghidra-sre.org/
After analyzing the binary with ghidra we’re able to see the source code.
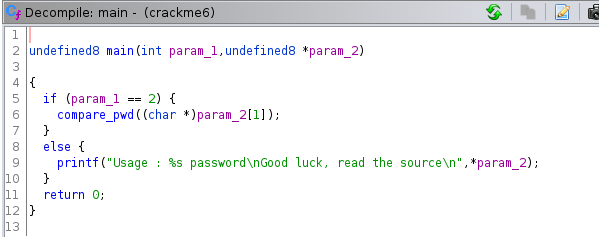
Going to the main function we can see that it calls a compare_pwd function.
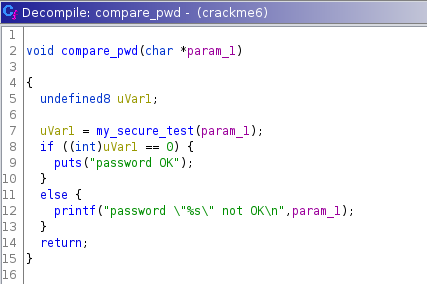
Looking at the compare_pwd() we see that it is calling another function called my_secure_test(). It stores the value that is returned by my_secure_test() in the uVar1 variable. It then checks that uVar1 equals 0. If it does then it prints then the password ok message, if it does not it prints the password not ok message.
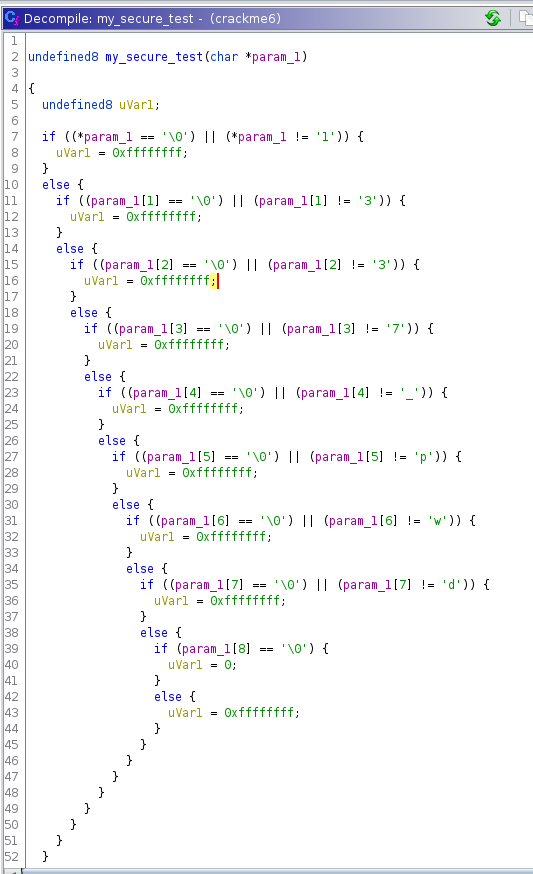
my_secure_test() is a series of nested if statements that checks for the correct password character by character. If all the characters match the function sets uVar1to 0 otherwise uVar1 is set to 0xffffffff.
By looking at the characters that are being compared we can see the correct password is 1337_pwd
Using the password we found gives us the password ok message.

Crackme7
Task 7: Analyze the binary to get the flag
The challenge tells us to analyze the binary and to get the flag.
The file command shows that this is a 32 bit elf file

The strings command shows us that this is a program that contains a menu with two options.
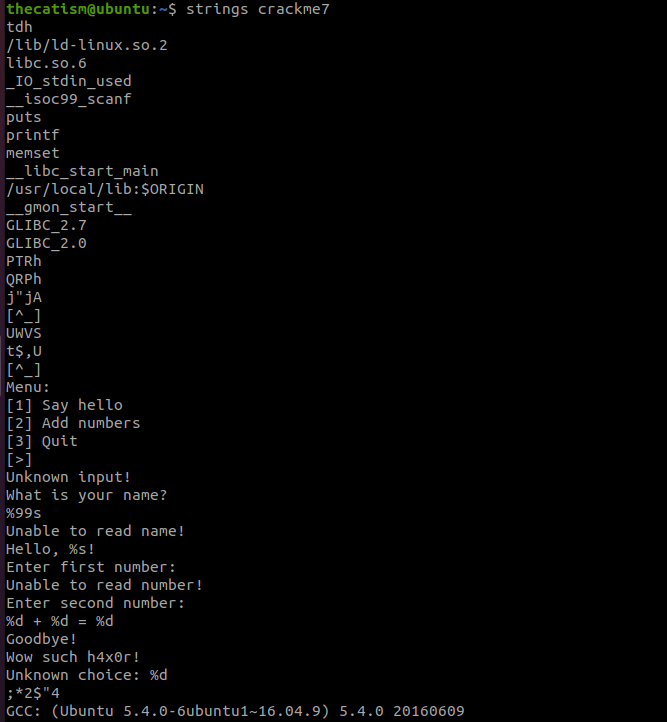
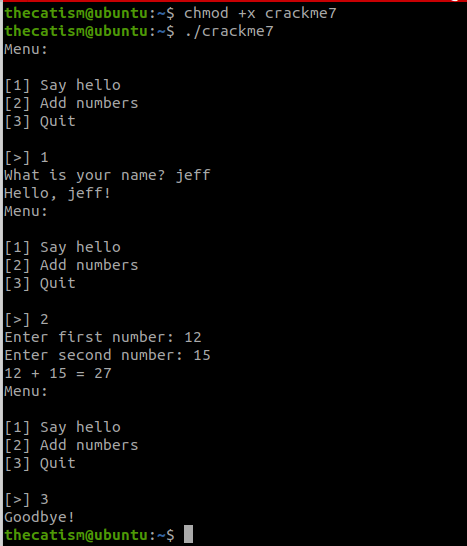
The first option is to give the program a your name which is echoed back. The second option is to give it two numbers to add up.
This can be confirmed when we run the program.
Loading the program the program into radare2 we see lots of jumps being called.
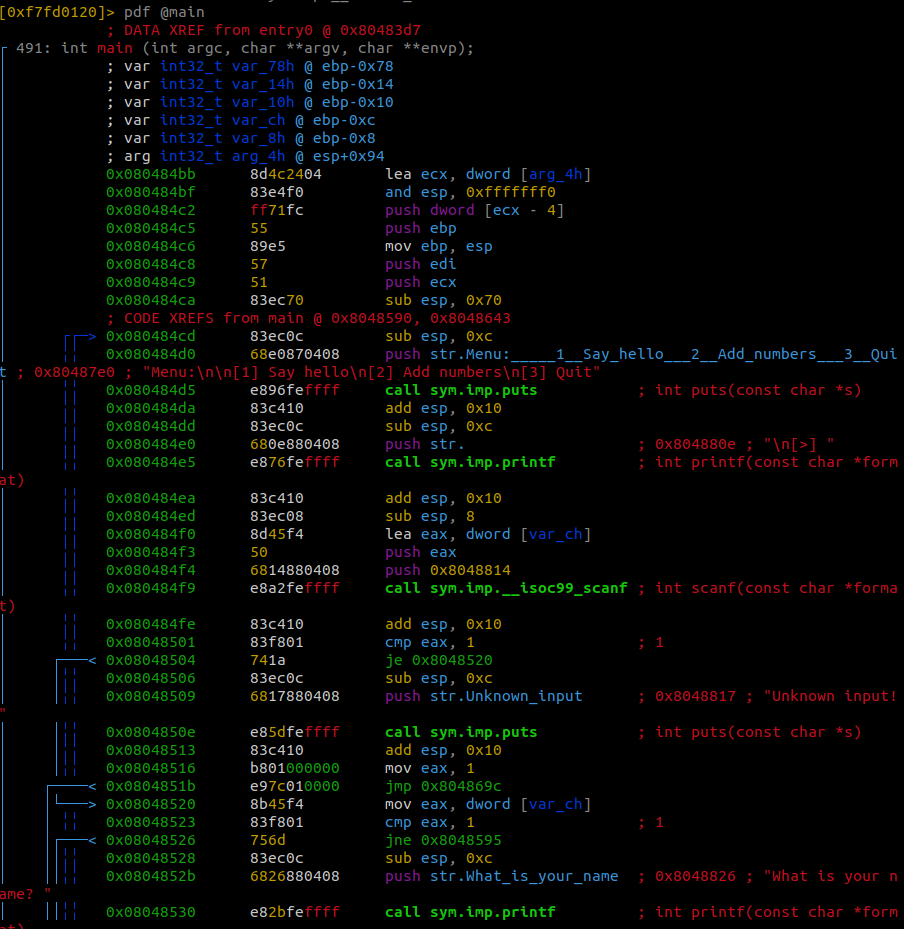
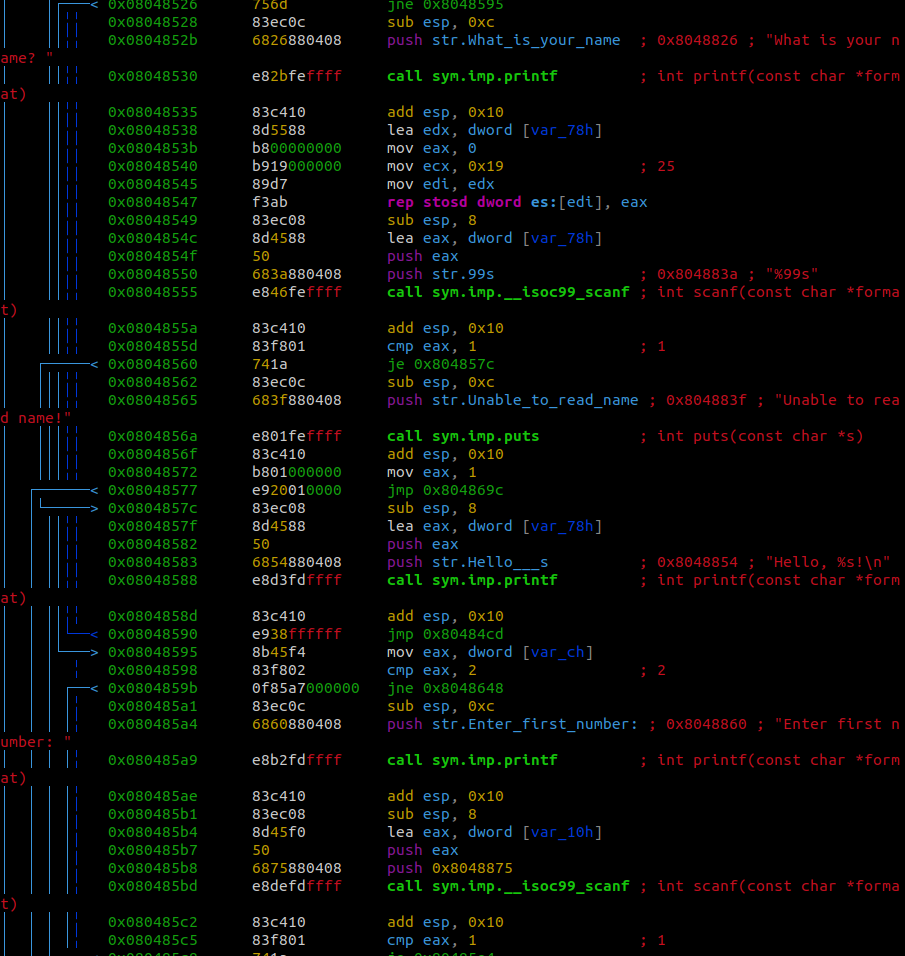
This means that there’s loops and conditionals being used within the program.
While scanning through the main function the first thing that catches my eye is 0x08048665.

0x08048665 shows that the program compares eax with 0x7a69, which is 31337 in decimal. If the two values are equal it will print out the Wow such h4x0r! message and give us our flag.
To see where we need to input the 31337 we can decompile the program and look at the main function.
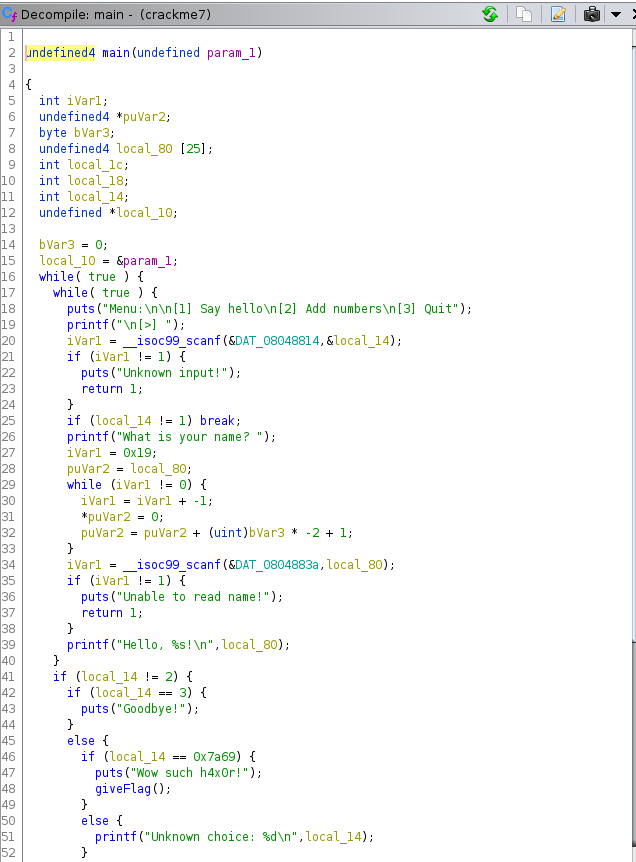
Looking at line 20 we can see that our input is stored in the variable local_14.
Scanning down the main we see that at line 41 there’s an if statement for if our input is not equal to two.
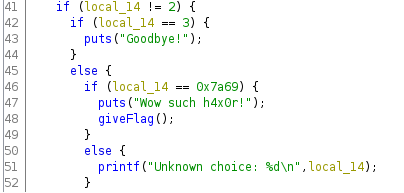
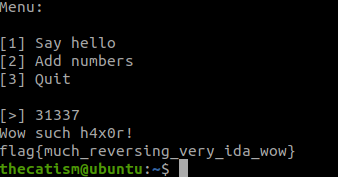
If our input is three we get the goodbye message but if our input equals 0x7a69 (the hex number we saw in radare2) in decimal format, we get the flag.
When input the number into the program we get our flag.
Crackme8
Task 8: Analyze the binary and obtain the flag
The challenge tells us to analyze the binary and to get the flag.
The file command shows that this is a 32 bit elf file

The strings command shows us that there aren’t any hard coded passwords.
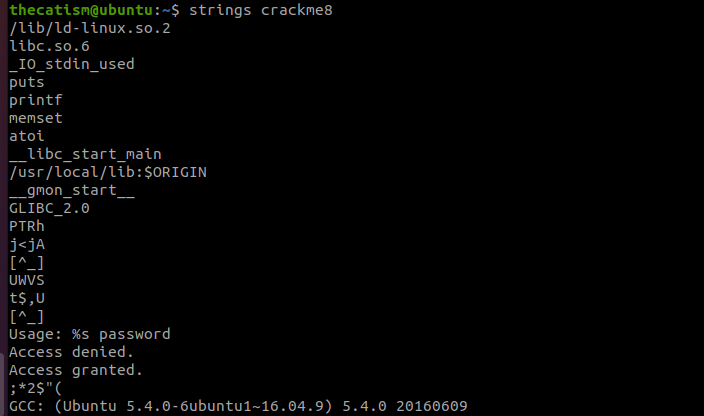
Running the program without a password arguement makes the program print out a usage message.
If we put in the wrong password then we get Access denied.

Disassembling the main with radare2 shows us that there is a comparison at 0x080484e4
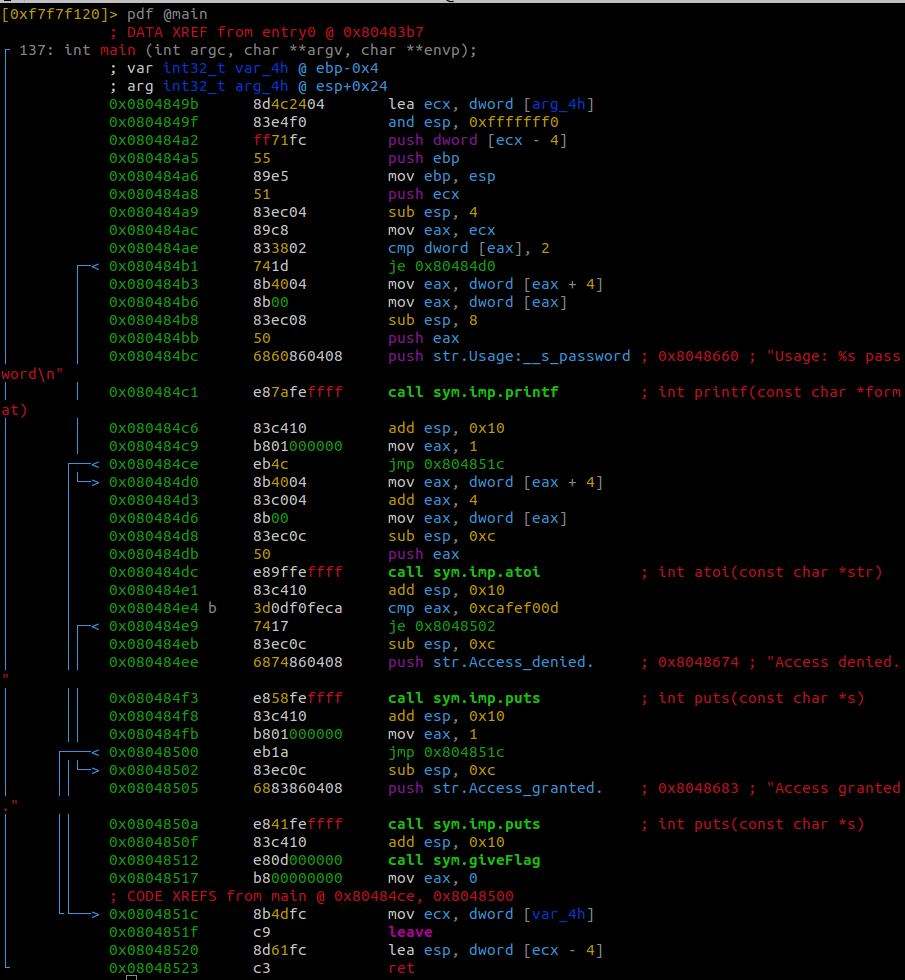
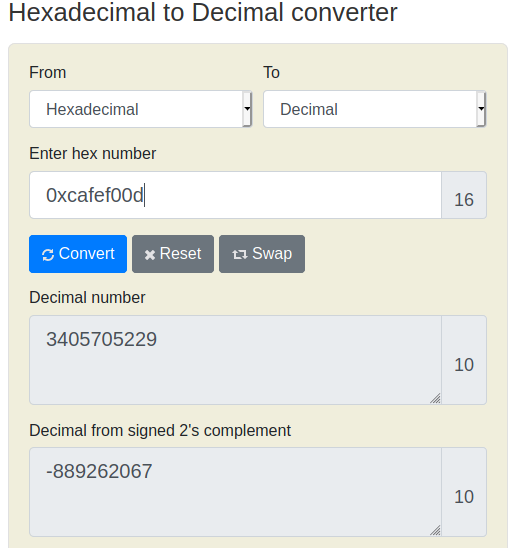
The program is comparing the eax register with the hex of 0xcafef00d. If the two are equal the program prints the flag.
Converting the hex to decimal gives us 3405705229 as the decimal number and -889262067 as the signed two’s compliment.
To get the flag we can either try both numbers or confirm which one we need by decompiling the program.
Using ghidra we can decompile the program to see what we need to provide as input in order for us to get the flag.
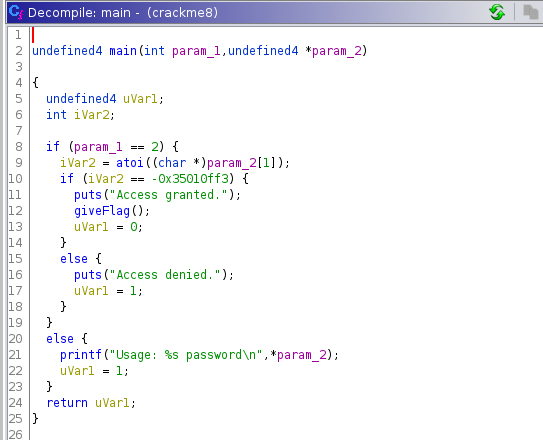
Looking at the main function shows us that at line 10 the program is comparing our string to -0x35010ff3. Converting the hex to decimal tells us which number the program is looking for.
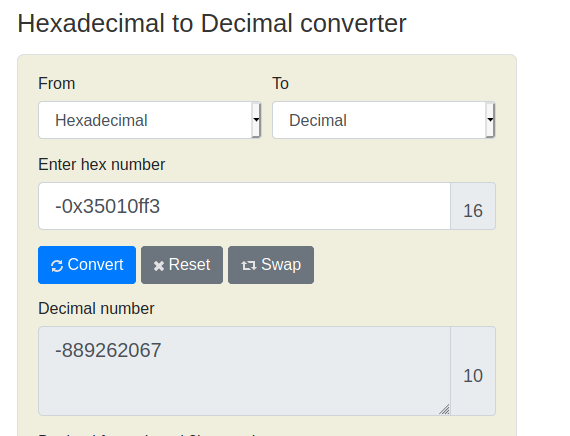
Putting the -889262067 as an arguement for the program gives our flag.

